(ชุดฝึก/ชุดสาธิต/ชุดจำลอง สำหรับการเรียนการสอน)
——————————————–
ชื่อนวัตกรรมการศึกษา แบบปฏิบัติการส่งข้อมูลระหว่าง Back-end และ Front-end สำหรับฟาร์มอัจฉริยะ ประกอบการเรียนการสอนวิชา การพัฒนาแอพพลิเคชันบนอุปกรณ์เคลื่อนที่สําหรับวิศวกรรมฟาร์มอัจฉริยะ
รหัสและชื่อรายวิชา Mobile Application Development for Smart Farm Engineering
อธิบายวิธีการทำ ประโยชน์ พอสังเขป
การพัฒนาแอพพลิเคชันบนอุปกรณ์เคลื่อนที่สําหรับวิศวกรรมฟาร์มอัจฉริยะ (Mobile Application Development for Smart Farm Engineering)
รหัสวิชา 03-407-322-409
เรื่อง การออกแบบระบบ Back-end และ Front-end Development
1.ที่มาและความสำคัญของปัญหา
ในยุคของเทคโนโลยีดิจิทัลและระบบอัตโนมัติ การควบคุมและตรวจสอบอุปกรณ์ไฟฟ้าหรือเซ็นเซอร์ระยะไกลผ่านเครือข่ายอินเทอร์เน็ต (IoT) กลายเป็นสิ่งสำคัญต่อการพัฒนานวัตกรรมในภาคอุตสาหกรรม การเกษตร และการดำเนินชีวิตประจำวัน หนึ่งในไมโครคอนโทรลเลอร์ที่ได้รับความนิยมคือ ESP32 ซึ่งมีคุณสมบัติในการเชื่อมต่อ Wi-Fi และ Bluetooth ได้ในตัว และสามารถประมวลผลข้อมูลร่วมกับเซ็นเซอร์หรืออุปกรณ์ควบคุมอื่นๆ ได้อย่างมีประสิทธิภาพ
การพัฒนา Web Server บน ESP32 เป็นแนวทางที่ช่วยให้สามารถควบคุมอุปกรณ์หรือรับค่าจากเซ็นเซอร์ผ่านหน้าเว็บที่ใช้งานง่ายจากสมาร์ตโฟนหรือคอมพิวเตอร์ โดยไม่ต้องติดตั้งแอปพลิเคชันเพิ่มเติม ส่งผลให้เกิดความยืดหยุ่นสูง และสามารถปรับใช้ในระบบอัตโนมัติระดับเบื้องต้นถึงขั้นสูง เช่น สมาร์ตฟาร์ม สมาร์ตโฮม หรือการแจ้งเตือนจากระยะไกล
แบบปฏิบัติการนี้จึงมีความสำคัญเพื่อให้นักศึกษามีความเข้าใจพื้นฐานของการสื่อสารผ่าน HTTP, การจัดการไฟล์ HTML บนไมโครคอนโทรลเลอร์ และการเชื่อมต่อกับระบบเครือข่าย โดยใช้เครื่องมือพัฒนาที่เข้าถึงง่าย เช่น Arduino IDE เพื่อเตรียมความพร้อมในการพัฒนานวัตกรรมจริงในอนาคต
2.วัตถุประสงค์ของแบบปฏิบัติการ
- เพื่อให้เข้าใจหลักการทำงานของ Web Server เบื้องต้นบนไมโครคอนโทรลเลอร์ ESP32
- เพื่อฝึกเขียนโค้ดควบคุม ESP32 ด้วยภาษา C/C++ บน Arduino IDE
- เพื่อเรียนรู้การเชื่อมต่อ ESP32 เข้ากับระบบ Wi-Fi และการสร้าง Web Page
- เพื่อทดลองควบคุมอุปกรณ์จริง (เช่น LED) ผ่านอินเทอร์เฟซหน้าเว็บ
- เพื่อปูพื้นฐานในการพัฒนา IoT ที่สามารถรับส่งข้อมูลแบบเรียลไทม์ผ่านเว็บเบราว์เซอร์
3.สิ่งที่คาดว่าจะได้รับจากแบบปฏิบัติการนี้
- ความเข้าใจในการใช้ ESP32 เพื่อเชื่อมต่อเครือข่าย Wi-Fi
- ความสามารถในการสร้าง Web Server ที่ฝังอยู่ในไมโครคอนโทรลเลอร์
- ทักษะการเขียนโค้ด HTML ร่วมกับภาษา C/C++
- ความเข้าใจในการรับ–ส่ง HTTP Request และ Response
- ทักษะในการควบคุมอุปกรณ์ทางกายภาพ (เช่น LED) ผ่านเว็บอินเตอร์เฟซ
- ความเข้าใจในการออกแบบระบบ IoT เบื้องต้น
- ทักษะการ Debugging ระบบฝังตัวผ่าน Serial Monitor
- ความพร้อมในการต่อยอดสู่โครงการ IoT จริง เช่น ระบบแจ้งเตือน, ระบบควบคุมระยะไกล, หรือสมาร์ตฟาร์ม
4.กระบวนการ ขั้นตอนการปฏิบัติการ
ภาพรวมของโปรเจ็กต์ (Project Overview)
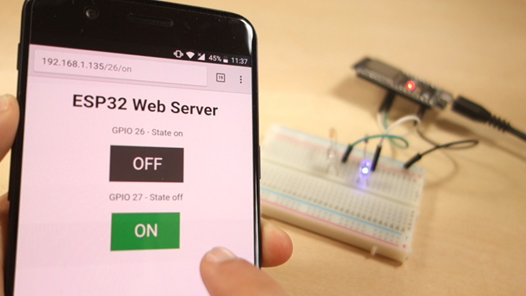
โปรเจ็กต์นี้จะสร้าง Web Server บน ESP32 ที่คุณสามารถควบคุมการเปิด–ปิดไฟ LED สองตัวผ่านเว็บเบราว์เซอร์ในเครือข่ายเดียวกัน โดยใช้ Arduino IDE ในการพัฒนา
- ESP32 ทำหน้าที่เป็น HTTP server
- มีปุ่มบนหน้าเว็บให้กดเพื่อสั่งเปิด/ปิด LED ที่เชื่อมกับพิน GPIO 26 และ GPIO 27
- รองรับการเข้าใช้งานผ่านสมาร์ทโฟนหรือคอมพิวเตอร์ที่อยู่ในเครือข่ายเดียวกัน (mobile-responsive)
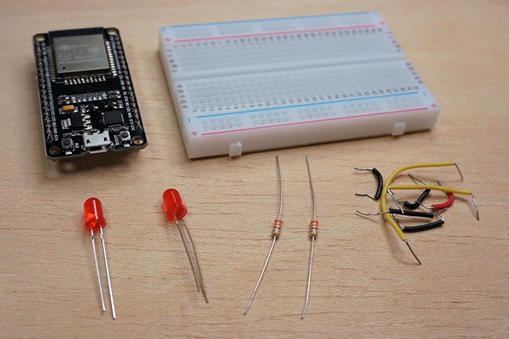
อุปกรณ์ที่ต้องใช้ (Parts Required)
- บอร์ด ESP32 Development Board (เช่น DOIT ESP32 DEVKIT V1)
- LED ขนาด 5 มม. จำนวน 2 ดวง
- ตัวต้านทาน 330 โอห์ม จำนวน 2 ตัว
- บอร์ดทดลอง (Breadboard)
- สาย Jumper สำหรับเชื่อมวงจร
ขั้นตอนติดตั้ง ESP32 บน Arduino IDE (Installing the ESP32 Board)
- เปิด Arduino IDE แล้วไปที่ File → Preferences
- ในช่อง “Additional Board Manager URLs” ให้ใส่:
3. https://raw.githubusercontent.com/espressif/arduino-esp32/gh-pages/package_esp32_index.json
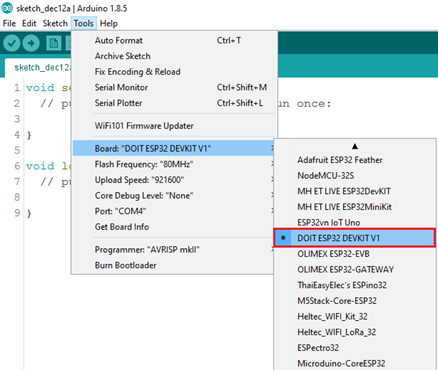
- เข้าไปที่ Tools → Board → Boards Manager ค้นหา “ESP32 by Espressif Systems” แล้วกดติดตั้ง
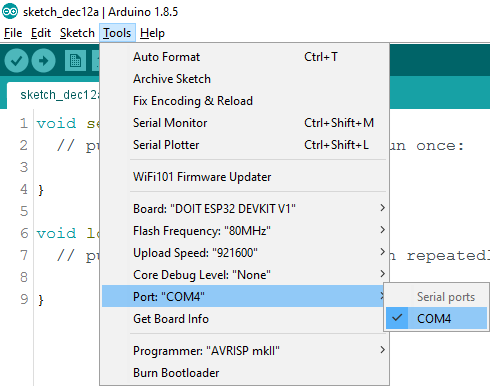
- เลือกบอร์ด ESP32 ที่คุณใช้งาน (เช่น DOIT ESP32 DEVKIT V1) และพอร์ตที่เชื่อมต่อ
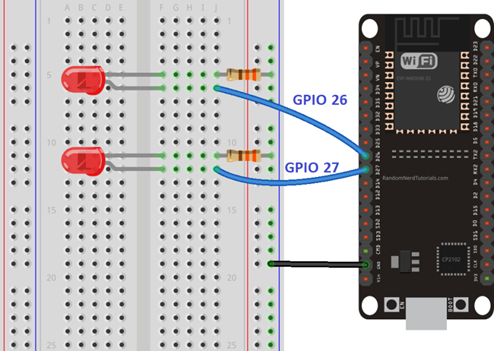
การต่อวงจร (Schematic)
- เชื่อม LED ตัวแรกที่ GPIO 26 ผ่านตัวต้านทาน 330Ω ไปยัง GND
- เชื่อม LED ตัวที่สองที่ GPIO 27 ผ่านตัวต้านทาน 330Ω ไปยัง GND
- ใช้บอร์ด ESP32 module และสังเกตให้แน่ใจว่าพินต่างๆ ถูกต้องตามรุ่นบอร์ดที่ใช้
ตัวอย่างโค้ด ESP32 Web Server (โค้ดใน Arduino IDE)
บทความมีการแจกโค้ดแนะนำในส่วนของ “ESP32 Web Server Code” ให้ส่ง HTML หน้าเว็บเพื่อควบคุม LED และรับคำสั่งจากผู้ใช้
โครงสร้างคร่าว ๆ ของโค้ด ได้แก่:
/*********
  Rui Santos
  Complete project details at http://randomnerdtutorials.com
*********/

// Load Wi-Fi library
#include <WiFi.h>

// Replace with your network credentials
const char* ssid = "REPLACE_WITH_YOUR_SSID";
const char* password = "REPLACE_WITH_YOUR_PASSWORD";

// Set web server port number to 80
WiFiServer server(80);

// Variable to store the HTTP request
String header;

// Auxiliar variables to store the current output state
String output26State = "off";
String output27State = "off";

// Assign output variables to GPIO pins
const int output26 = 26;
const int output27 = 27;

// Current time
unsigned long currentTime = millis();
// Previous time
unsigned long previousTime = 0;
// Define timeout time in milliseconds (example: 2000ms = 2s)
const long timeoutTime = 2000;

void setup() {
  Serial.begin(115200);
  // Initialize the output variables as outputs
  pinMode(output26, OUTPUT);
  pinMode(output27, OUTPUT);
  // Set outputs to LOW
  digitalWrite(output26, LOW);
  digitalWrite(output27, LOW);

  // Connect to Wi-Fi network with SSID and password
  Serial.print("Connecting to ");
  Serial.println(ssid);
  WiFi.begin(ssid, password);
  while (WiFi.status() != WL_CONNECTED) {
    delay(500);
    Serial.print(".");
  }
  // Print local IP address and start web server
  Serial.println("");
  Serial.println("WiFi connected.");
  Serial.println("IP address: ");
  Serial.println(WiFi.localIP());
  server.begin();
}

void loop(){
  WiFiClient client = server.available();   // Listen for incoming clients

  if (client) {                             // If a new client connects,
    currentTime = millis();
    previousTime = currentTime;
    Serial.println("New Client.");          // print a message out in the serial port
    String currentLine = "";                // make a String to hold incoming data from the client
    while (client.connected() && currentTime - previousTime <= timeoutTime) {  // loop while the client's connected
      currentTime = millis();
      if (client.available()) {             // if there's bytes to read from the client,
        char c = client.read();             // read a byte, then
        Serial.write(c);                    // print it out the serial monitor
        header += c;
        if (c == '\n') {                    // if the byte is a newline character
          // if the current line is blank, you got two newline characters in a row.
          // that's the end of the client HTTP request, so send a response:
          if (currentLine.length() == 0) {
            // HTTP headers always start with a response code (e.g. HTTP/1.1 200 OK)
            // and a content-type so the client knows what's coming, then a blank line:
            client.println("HTTP/1.1 200 OK");
            client.println("Content-type:text/html");
            client.println("Connection: close");
            client.println();

            // turns the GPIOs on and off
            if (header.indexOf("GET /26/on") >= 0) {
              Serial.println("GPIO 26 on");
              output26State = "on";
              digitalWrite(output26, HIGH);
            } else if (header.indexOf("GET /26/off") >= 0) {
              Serial.println("GPIO 26 off");
              output26State = "off";
              digitalWrite(output26, LOW);
            } else if (header.indexOf("GET /27/on") >= 0) {
              Serial.println("GPIO 27 on");
              output27State = "on";
              digitalWrite(output27, HIGH);
            } else if (header.indexOf("GET /27/off") >= 0) {
              Serial.println("GPIO 27 off");
              output27State = "off";
              digitalWrite(output27, LOW);
            }

            // Display the HTML web page
            client.println("<!DOCTYPE html><html>");
            client.println("<head><meta name=\"viewport\" content=\"width=device-width, initial-scale=1\">");
            client.println("<link rel=\"icon\" href=\"data:,\">");
            // CSS to style the on/off buttons
            // Feel free to change the background-color and font-size attributes to fit your preferences
            client.println("<style>html { font-family: Helvetica; display: inline-block; margin: 0px auto; text-align: center;}");
            client.println(".button { background-color: #4CAF50; border: none; color: white; padding: 16px 40px;");
            client.println("text-decoration: none; font-size: 30px; margin: 2px; cursor: pointer;}");
            client.println(".button2 {background-color: #555555;}</style></head>");

            // Web Page Heading
            client.println("<body><h1>ESP32 Web Server</h1>");

            // Display current state, and ON/OFF buttons for GPIO 26
            client.println("<p>GPIO 26 - State " + output26State + "</p>");
            // If the output26State is off, it displays the ON button
            if (output26State=="off") {
              client.println("<p><a href=\"/26/on\"><button class=\"button\">ON</button></a></p>");
            } else {
              client.println("<p><a href=\"/26/off\"><button class=\"button button2\">OFF</button></a></p>");
            }

            // Display current state, and ON/OFF buttons for GPIO 27
            client.println("<p>GPIO 27 - State " + output27State + "</p>");
            // If the output27State is off, it displays the ON button
            if (output27State=="off") {
              client.println("<p><a href=\"/27/on\"><button class=\"button\">ON</button></a></p>");
            } else {
              client.println("<p><a href=\"/27/off\"><button class=\"button button2\">OFF</button></a></p>");
            }
            client.println("</body></html>");

            // The HTTP response ends with another blank line
            client.println();
            // Break out of the while loop
            break;
          } else { // if you got a newline, then clear currentLine
            currentLine = "";
          }
        } else if (c != '\r') {  // if you got anything else but a carriage return character,
          currentLine += c;      // add it to the end of the currentLine
        }
      }
    }
    // Clear the header variable
    header = "";
    // Close the connection
    client.stop();
    Serial.println("Client disconnected.");
    Serial.println("");
  }
}
อธิบายส่วนสำคัญ:
- เชื่อม Wi-Fi ด้วย WiFi.begin() และรอเชื่อมต่อจนสำเร็จ
- ใช้ server.begin() เพื่อเริ่ม HTTP server
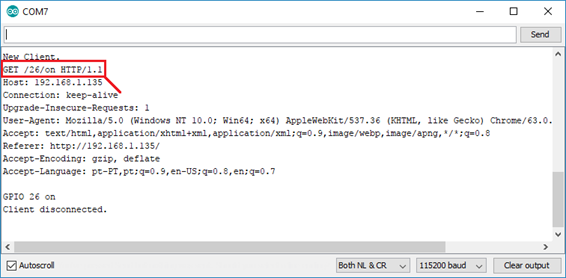
- ใน loop() รับการเชื่อมต่อจาก server.available() แล้วอ่าน HTTP request
- ตรวจสอบพารามิเตอร์ (เช่น “GET /?led1=on”) เพื่อสั่งเปิด/ปิด LED
- ส่ง HTML หน้าเว็บที่มีปุ่มกดกลับไปยังเบราว์เซอร์
เลือก port com
การดู IP และทดสอบ
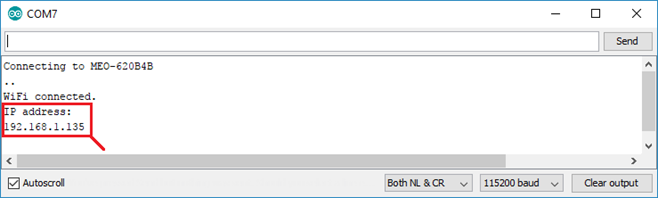
- เปิด Serial Monitor ที่ baud rate 115200
- ESP32 จะแสดง IP address ที่มันได้รับ เช่น 192.168.1.123
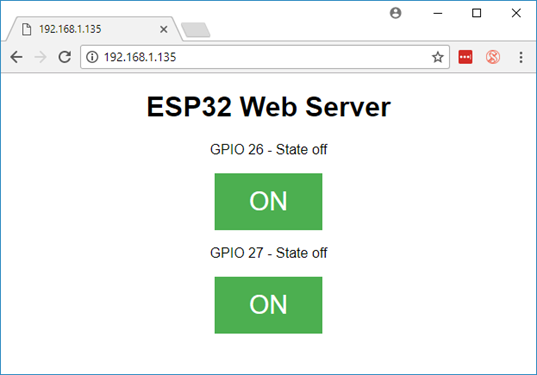
- เปิดเว็บเบราว์เซอร์ แล้วพิมพ์ IP นั้น ตัวอย่างเช่น http://192.168.1.123
- หน้าเว็บจะปรากฏปุ่มควบคุม LED สองตัว เมื่อคลิกแล้ว ESP32 จะควบคุม LED ตามคำสั่งในเว็บอย่างทันที
สรุป โปรเจ็กต์นี้ช่วยให้นักศึกษาได้เรียนรู้และเข้าใจ
- วิธีตั้งค่า ESP32 บน Arduino IDE และต่อวงจร
- การเชื่อม Wi‑Fi และทำ ESP32 ให้กลายเป็น Web Server พื้นฐาน
- การรับ HTTP request, ประมวลผลคำสั่ง, และตอบกลับ HTML
- สามารถควบคุมอุปกรณ์จริง (เช่น LED) ผ่านหน้าเว็บอินเตอร์เฟซแบบเรียลไทม์
- ภาพรวมการออกแบบระบบ Back-end และ Front-end